


Stories and Lessons Learned
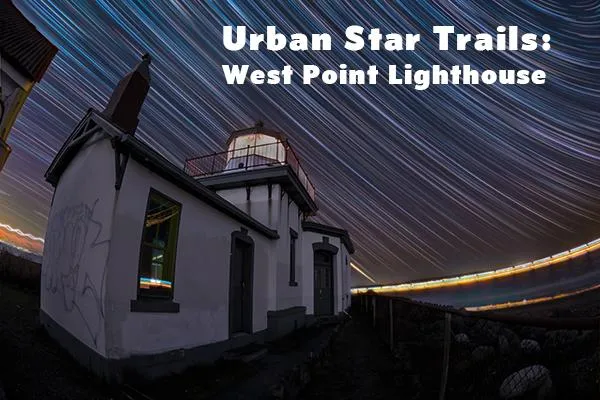
Urban Star Trails: West Point Lighthouse
🚧Caution:New Concepts Ahead!
I’m building an online star trails course and need a few test pilots. If you want free early access in exchange for feedback, email me 🚀 Matt@MilkyWayMatt.com 🚀
A little context: Just what ARE star trails?
A star trails photo is a long exposure image that captures the motion of the stars. They usually capture at least 20 minutes of movement, but they can last all night.
Back in the day, they would be shot as a single veeeeery long exposure, and some photographers still do that. My preferred technique is to shoot a series of consecutive shots, and assemble them in Photoshop. In this case, I shot about 800 exposures (10 seconds each) over roughly 2.5 hours.
Star trails come to life in post production, and I'll go over the whole process in my course.
Can you photograph the stars from inside the city?
Everyone knows you can’t shoot stars from the city. Or at least, they think they do. And, okay, they’re not completely wrong—light pollution washes out the stars, making it tough to get a satisfying single exposure of the Milky Way.
But here’s the thing: star trails are different. Since they capture the motion of the stars over time, the right technique can turn even a light-polluted city into an astrophotography playground.
I chose a relatively dark spot inside the city—emphasis on relatively. It’s way brighter than a place I’d normally shoot the Milky Way, but dark enough for star trails to work.
Here's a light pollution map of Seattle. Red is brightest, but green doesn't mean "good to go," it's still way too bright.

For reference, you can click the link below for a map of light pollution in all of Washington State. I'm usually trying to get to the center of the dark grey areas for true dark skies.
Shooting the star trails
It was a crystal-clear, cold winter night in Seattle. I usually arrive in the daytime to frame my shot, but it was a workday, so I couldn't get there before dark. Fortunately, I'd been to this location before— I had a pretty good idea of what I wanted. As soon as I got there, I put on my red headlamp and got to work!
Survey the Possibilities: I don’t start framing through the lens right away. It's important to look around first, so I don't miss anything.
Find the Composition: I opted for a fisheye lens to capture as much sky as possible, and took about 20 shots before I landed on the right frame.
Dial in the Settings: I settled on:
✅ ISO 1600
✅ 𝑓/4
✅ 10 second exposureStart Shooting: I connected the intervalometer, locked the shutter button down, and just hoped I had gotten everything right. Focus, settings, battery power, card space, even a loose intervalometer cable can void all my efforts, but this time nothing went wrong.
Try to stay warm!
Once the camera started shooting, all I could do was sit, wait, trying to keep from turning into a popsicle. The big excitement was when a pack of 50+ runners with headlamps came barreling through. Cool to see, but I knew those headlights would be hard to clean up in post.
After about 2.5 hours, I was officially frozen! 🥶🥶🥶 Time to pack up and head home.
Processing the shots
The first thing I did when I got back home was stack the images in Photoshop to preview the work ahead, identify challenges, and plan solutions. I could see that a lot of plane trails would have to be removed, and the runners lights looked like a real challenge.

💻 Split up the file: My first challenge was file size. I needed to keep the layers stacked to remove the plane trails, but 800 images in one Photoshop document was more than my computer could handle, so I broke the stack up into 4 separate documents with 200 images stacked in each. Then I could get down to work.

🚨 Runner lights: Those headlamps would have to be removed. They completely washed out one frame. I had to cut that shot, which I hate doing because it can leave gaps in the star trails. But sometimes, there’s no saving a frame. Here's a before and after.

✈️ Plane trails: So. Many. Planes. Cleaning them up was a slow, meticulous process, but I’ve developed some scripts and automations that make it way faster.

🎨 Perfect the aesthetic: This is where I got to make creative choices, and collaborate with nature. I selectively adjusted hue, luminosity and saturation, added a glow, and made other adjustments until I was happy with the image.

The whole process took about 20 hours - here's what it would look like if I could have gotten it done in 15 seconds!Here's the final image
Want to Learn How to Shoot Star Trails Like This?
This was a broad overview of the process. The full course will cover every aspect of shooting beautiful star trails just like this. I'm looking for 8–10 people to take them for free in exchange for feedback and an honest review. Want in? Shoot me an email!Matt@MilkyWayMatt.com